Basics of Systematic Troubleshooting
GC Troubleshooting Course
1 - Basic Steps
2 - Tailing Peaks
3 - Broad Peaks
4 - No Peaks
5 - High Baseline
6 - Unstable Baseline
7 - Carryover/Ghost Peaks
8 - Fronting Peaks
9 - Poor Peak Resolution
10 - Split Peaks
11 - Response Variability
12 - Retention Time Variability
13 - Course Summary & Test
Welcome
We’re excited to have you with us for this six-week journey into the world of troubleshooting and preventing common errors in Gas Chromatography (GC) . Each week, you’ll receive an email with links to two course modules designed to enhance your understanding and skills in GC troubleshooting. In this first week, we’ll establish the foundations of systematic troubleshooting and then move on to a common chromatographic issue — tailing peaks — including what causes them and how to fix them. Let’s dive right in!
Basic Troubleshooting Steps and GC Components
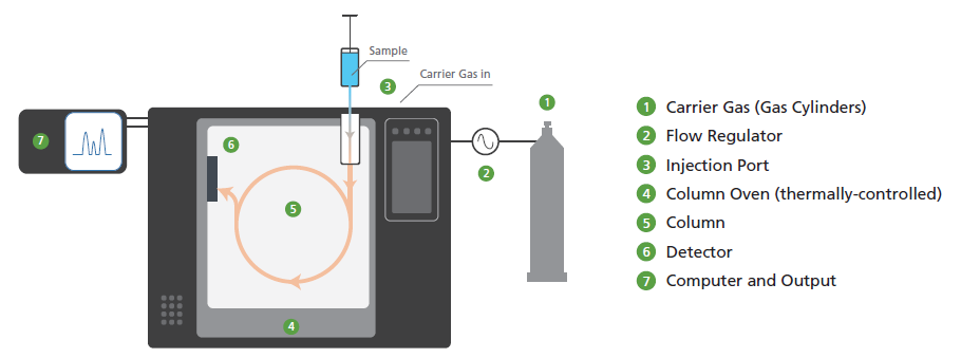
A systematic, step-by-step approach is crucial for effective troubleshooting and problem resolution. But before we dive into the troubleshooting steps, we’ll begin with an overview of the GC system and its key components. Gas Chromatography separates the components of a mixture using a high-purity gas as the mobile phase and a column coated with a stationary phase. The mobile phase or carrier gas, as it is often referred to, needs to be a high purity inert gas —commonly helium, hydrogen, or nitrogen. The stationary phase is coated or bonded to the interior of a fused silica capillary column and facilitates separation through its interaction with the sample.
- A typical GC system comprises of:
- High-purity gases (mobile phase and for detectors to function)
- Injector (to introduce the sample onto the column)
- Column (to perform the separation)
- Column oven (to control the separation and elution of compounds)
- Detector (to detect the eluting components)
- Data system (to process the signal from the detector)
-
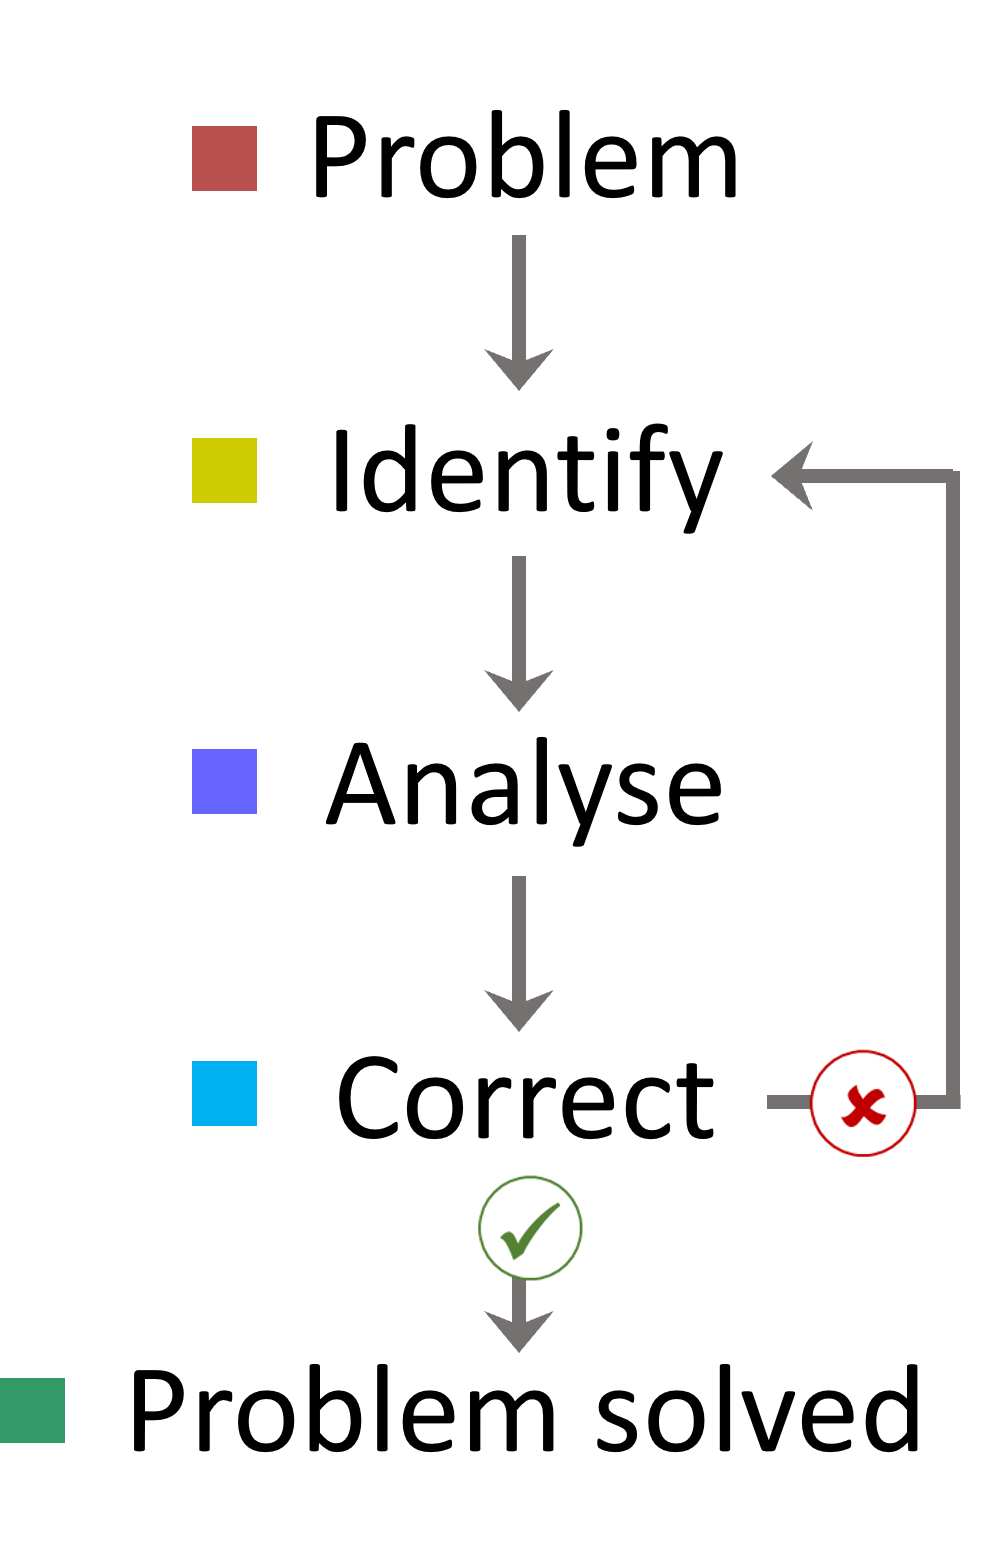
- When an issue arises and the the root cause of a problem isn’t immediately clear, the most effective approach is to work through the GC workflow from the sample introduction system to the detector.
- Remember these golden rules when trying to isolate the cause of the problem, check the obvious first, only change one thing at a time, document everything and always throw away used or damaged parts/consumables.
- Let's now walk through each step in the troubleshooting process.
- Check the basics
- When something goes wrong, it can be tempting to jump straight to complex or advanced causes. However, in our experience, it’s always worthwhile to start by checking the more obvious possibilities—consider it a quick sanity check for anything unexpected. Taking a moment to rule out the basics can save valuable time during troubleshooting and ensures that issues are addressed as efficiently as possible.
- Power: First, check that your power supply is on, and that all your electrical connections and signal connections are secure.
- Sample preparation: The next step is to look at your sample prep – go right back to the first step, and check that you’re following the method to the letter. Make sure that all your glassware is clean and that the sample preparation equipment is be working correctly.
- Analysis: Now take a look at your analytical conditions, including temperature settings, and confirm that they have been downloaded correctly to the instrument in accordance with your procedure.
- Gases: Lastly, check your gas purity, flows, and supply. Carrier and detector gases must be high purity, (5.0 / 99.999% or above) and completely dry. In line gas filters placed to remove oxygen, moisture and hydrocarbons have easy to read indicators, which show when the sorbent becomes saturated and should be replaced. Also, ensure all taps are open and line pressures are within the correct range (300–900 kPa). Finally, check for leaks, using a detector (if available) to confirm that the gas connections, including the GC column, have not sprung a leak.
2 Define the limits of the problem
It is important that you clearly identify what is going wrong—and when the problem occurs. This is essential for effective troubleshooting. The more precisely you can define the issue, the easier it is to spot patterns and find a solution. Comparing method files and data files from a ‘good’ run with those from a problematic one is often a good starting point. Look for any changes in peak shape, base line, noise and contamination. Also, check the method parameters for any alterations. Keep in mind that some issues may be due to a gradual decline in function and have started long before they become noticeable. Reviewing maintenance or sample logs can help you spot gradual changes or missed routine tasks.
3 Consider potential causes
Once the problem is clearly defined, start narrowing down possible causes. Be systematic—begin at the start of the workflow with the autosampler and injection inlet before moving on downstream to the column, oven, detector and PC, checking each part of the system step by step. Only change one variable at a time, this will enable you to accurately identify the cause and can potentially save you time troubleshooting in the future should the issue occur again.
4 Document everything
It’s important to document all the troubleshooting steps you considered, along with their results. This will not only be useful for the engineer if you need to contact them, but having a record is a useful reference point, helping you identify and solve the next problem more quickly.
5 Run a test mix
Once you think you’ve resolved the problem, always inject a test mix, and compare it to previously acquired data to ensure performance is restored.
Running a test mix (such as an alkane test mix) is a recommended step after any troubleshooting sequence to ensure that the system is functioning correctly, and everything is back to normal.
Daily Considerations
Alongside troubleshooting, regular daily checks are key to maintaining optimal GC performance and preventing problems before they arise. Here are some practical daily tasks to keep your system running smoothly:
- Gas lines – is there sufficient carrier/detector gas availability and pressure? Check pressure gauge on the cylinder or manifold to ensure gas is being supplied to the instrument within the specified range (usually 300 – 900 kPa). If using a hydrogen generator, does this have sufficient deionised water?
- Injection – is the syringe in good condition? Check that the syringe is moving freely without sticking and if required, clean with fresh solvent (ideally with polar and non-polar variants). Check that the solvent wash vials are sufficiently filled to reduce possible carryover.
- Consumables – when were the septum and liner last replaced? Some software’s have counters to help you to schedule regular maintenance. If this is not available, check your maintenance log. It is recommended that septa and liners are changed after 100 sample injections. If this limit is exceeded, then it may be worth checking the condition of the septum and liner and replacing if required.
- Column – have I been seeing higher baselines in my recent sample analysis? A column condition/clean-up/bake-out should help. Raise the column oven temperature to 10 degrees lower than the column’s recommended max temperature and hold for an hour to see improvement. The inlet/detector ends of the column could also be trimmed and re-fitted with new ferrules.
- Test injection – regularly analysing a standard containing a known compound, will give useful information on the state of the instrument. Record and trend parameters such as retention time, peak response and peak shape to help you to plan preventative maintenance.
If after exploring all the possible avenues, you’re still having problems, then let us know! Email gc_gcms_support@shimadzu.co.uk.
Your Shimadzu GC Team
Related Resources